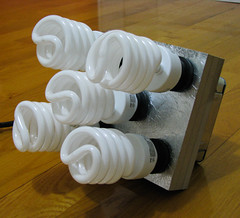
I finally had some time to complete the softbox that was meant to go along this light fixture.
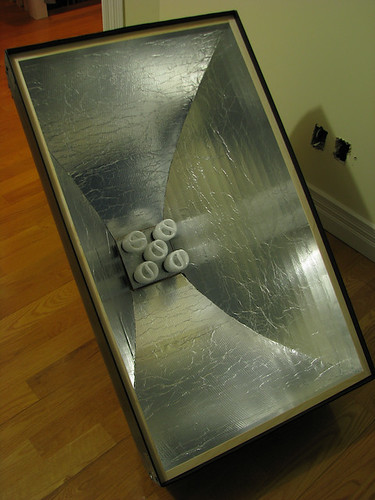
Here's what it looks like (without the diffuser panel):
I am so happy. The whole thing is very lightweight and also really strong. It also costs a fraction of a real softbox. Be advised though, this won't be done in an hour. It took me several hours to build it, and it is mostly because of the curved shape of the 4 sides. A "pyramidal" shaped softbox would have been much less complicated. But hey... does it look cool or what !
To build this baby you will need:
- a 4' x 8' sheet of black corrugated plastic. Also called Coroplast (about 20$ and you can get it at your local signmaker or hardware store).
- a roll of STRONG aluminum foil
- Spray adhesive
- Aluminum tape
- Some wood to make the frame
- Some material for the diffuser panel. I bought a piece of ripstop nylon. Seems to work fine and it is also the "standard" material for this purpose.
- a couple of "L" shaped metal brackets
- Tools: Knife, scissors, T-50 stapler + staples
That's pretty much it! About 35$ total for everything.
Here's how it was done:
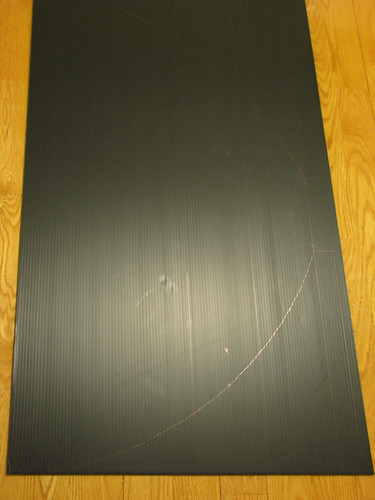
Here's is a piece of coroplast with the layout of one of the big side parts.
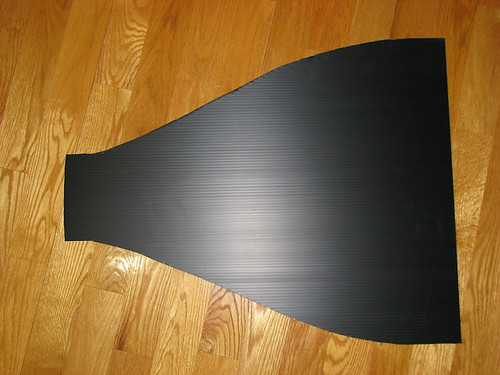
One of the sides cut out. Notice the direction of the channels on this piece. This is important ! (No, I did NOT cut this on the hardwood floor!)
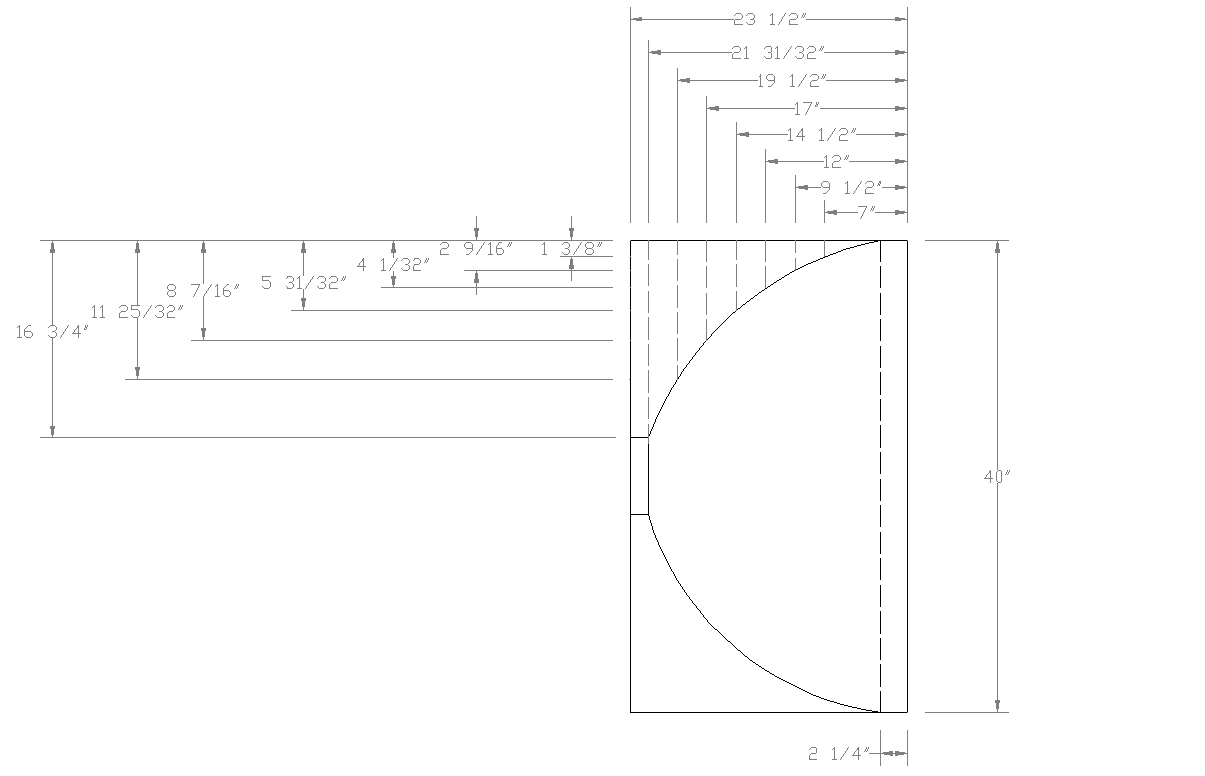
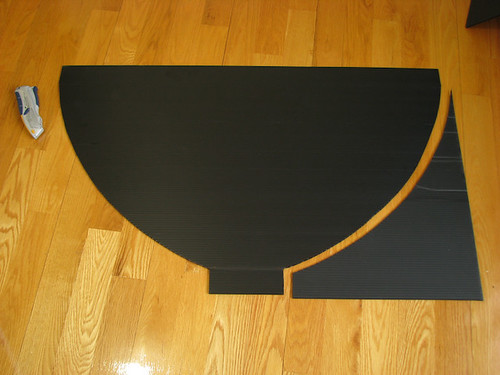
Here's a template for cutting the sides. Click for full size jpg.
Cutout of one of the top/bottom panels. Notice the direction of the channels on this piece. This is important !
When you bend coroplast in the wrong direction, it can be desastrous. To avoid permanent fold marks, simply take a very sharp knife and cut the FIRST HALF the the coroplast layer. I did a cut every inches or so. This allows the whole panel to bend nicely without any problem (at least not yet...more details coming).
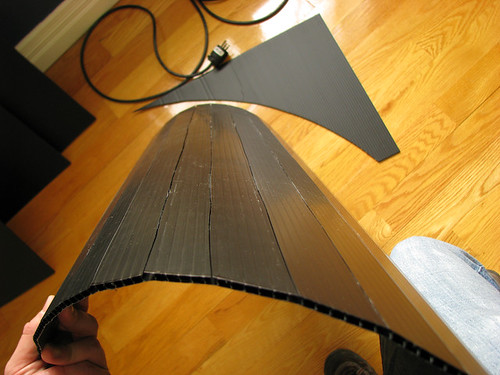
Aluminum foil applied to the panel with spray adhesive.
***** UPDATE May 1st 2008 *****
It has been brought to my attention that Mylar (the stuff heat survival blanket are made of) could do a much better job of reflecting that precious light. A good thing to know. I will probably replace the alu foil with some of this mylar soon...
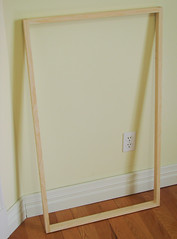

Here's the wood frame what will hold everything together. It will also be used to hold the diffusion panel as well. I did not picture any steps regarding the construction of this frame since the excellent strobist, do-it-yourselfer and photographer Nick Wheeleroz already did it when he build his own softbox. Click here to read his tutorial on building the wood frame. While you're there, take a couple minutes to check his incredible work too!
By the way Nick, I am a professionnal woodworker myself and i built it exactly the same way as you did. See, no need to go with fancy joinery on that thing :o)
The only difference with his version and mine is that I built it a bit thicker and added a additionnal screw from the side for increased stability.
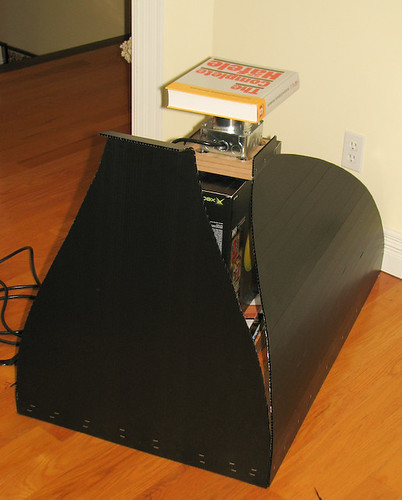
Here's the part where I TOTALLY SUCKED at this project. The fact that I had cut the first layer of the coroplast to make it bend easier, also made it really soft. I had to temporarily attach both of the softbox sides to the Spiderlight fixture and figure out a crude way to support and secure the whole thing while installing the top and bottom panels. The side panels were first stapled on the wood frame.
I did not know what the final shape of the top/bottom panels would be so I had to take a big piece of thin cartboard and lay it down over the two installed sides and trace it out. I then transferred the layout on the coroplast panels.
Maybe I am making this sound simple but in fact it took me two whole afternoons of head scratching to figure out a way to do it all. Hopefully one of you guys will figure out a better way to do it and post it on this thread.
Oh and I forgot, the top/bottom panels were first stapled to the wood frame. Then, they were connected to the side panels using black duct tape. I know, it ain't pretty, but is holds damn well. At least it's not grey!
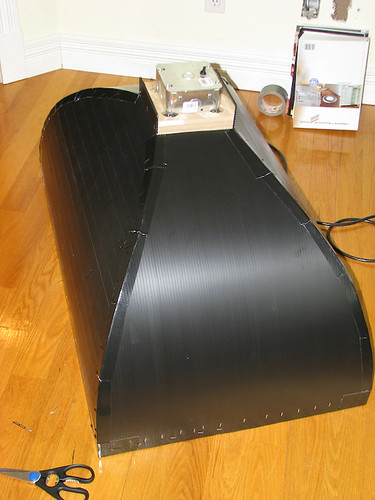
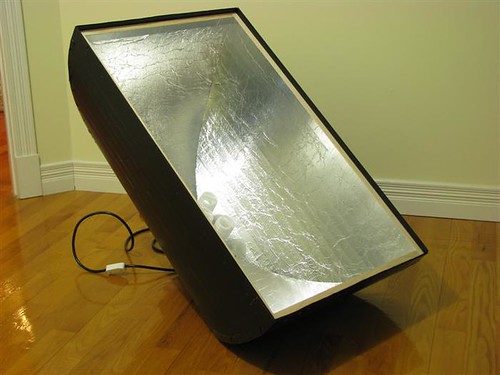
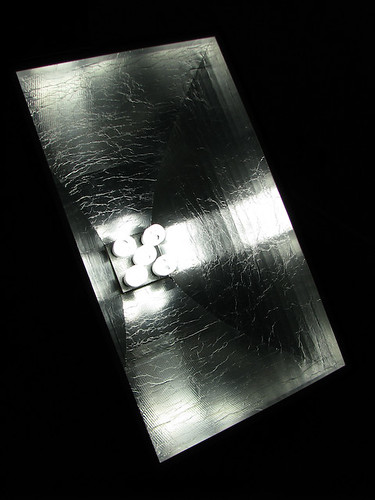
The completed softbox. Ain't it pretty ?
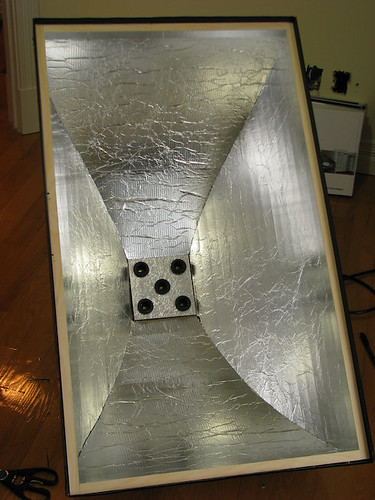
A quick look from the inside.
Lightbulbs in. Ready... set....
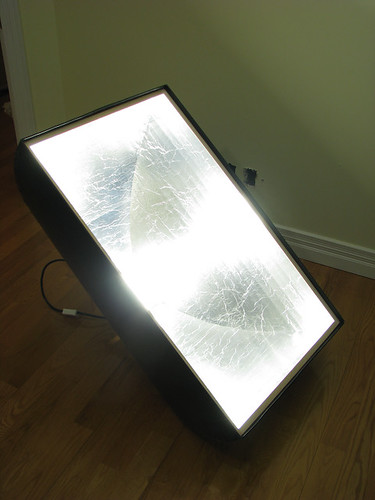
Yeouch! My eyes! :o)
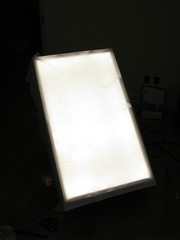
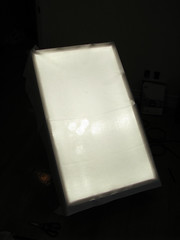
I placed the diffusion panel (cotton sheet) over the softbox for testing purposes. Both of these shots were taken at 1/200 f2.8 ISO 80. The first one is with all 5 bulbs turned on. The second one is with only 3 of the bulbs turned on (see my tutorial on the DIY-Spiderlight for more details). You can really see the difference in brightness.
Taken at 1/1600 f2.8 ISO 80
Now a first field test (BEWARE OF THE MONSTER):
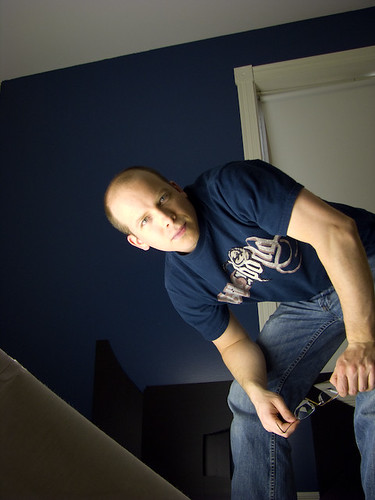
Yep. It's me. Turned off all other lights in the room and set my camera on the tripod. This shot is not really good. Here's why:
1- I was alone. I had to pre-focus on... thin air. No subject to focus on since i'm behind the camera while composing the shot. That's why it ain't sharp.
2- The softbox is still on the floor. I haven't got my lightstand and swivel bracket yet.
3- The subject is ugly!
4- Again I was alone so no one or/and no lightstand yet to hold a reflector for me.
Anyway. It does work! This was shot at 1/30 f2.8 ISO 80 (please note I shot this using a Powershot S5 IS. The f2.8 on my camera is much more slower than the real f2.8 you are getting on a DSLR lens.). Still a bit too overexposed on the lightened side. Of course this kind of light is not to be used to picture an excited child moving around.
That's pretty much it! Later this week i will install the diffusion panel with velcro on the wood frame. I will also work out a way to make the spiderlight removable with some sort of washers and wing nuts...
As soon as I have my lightstand I will do some more serious testing with hopefully better subjects than me.
Might take a while though... I want to order my first "off-camera" flash. But then I have to decide between Nikon or Canon, but then I have to decide of my next camera as well... and so as lenses and BLAAAHHHHH!!!!!
Anyway. Just give me a couple weeks. I'll be updating this thread as soon as everything is in.
Hope you like the softbox!
Here's some more test shots:
1/60 f2.8 ISO100, No diffusion screen, Softbox on left, DIY reflector on right
1/40 f2.8 ISO100 No diffusion screen, Softbox on left, DIY reflector on right
1/40 f2.8 ISO100 WITH cotton diffusion screen, Softbox on left, DIY reflector on right. Again,please note I shot this using a Powershot S5 IS. The f2.8 on my camera is much more slower than the real f2.8 you are getting on a DSLR lens.
Next chapter: Mounting the whole kit on a light stand!
35 comments:
Hi Alex,
You´ve done a great project !
Can you post the template for cutting of the top/bottom panels?
Emilio
Hi
this is amazing
how did you calculate the curves of side panels anyway ?!
can you post more clearer and simplify measuring template. this one is hard to understand.
Hola Alex. Muy esclarecedor y didactico. ya me pondre a hacerlo!
Saludos desde Argentina
Hi Alex. Very enlightening and educational . and I'll get to it!
Greetings from Argentina
HI did you get the complete socket set or where did you get it and how much did you pay for it thank you
It's seems pretty easy. I'll improve it. Thanks for your instruction.
Because of the width of the table saw, there were a few short ones at the end, so I'll use those for something else. http://www.jx-plastic.com/corrugated-roll/
Having the watercolor kit affixed to the foam-core and the water container in place allows more freedom of movement and makes painting under any circumstance a whole lot easier. The neat thing is it really works and it's easy and inexpensive to make.
........Coroplast Sheets Suppliers,jx-plastic.com/coroplast-sheet/..........
I really loved reading your blog. It was very well authored and easy to undertand. Unlike additional blogs I have read which are really not tht good. I also found your posts very interesting. In fact after reading, I had to go show it to my friend and he ejoyed it as well! coroplast sheets 4x8
For any concern and help just visit website for Office.com/Setup help and key activation of setup You can do it by yourself if you know how to install office.com/Setup on your PC or Mac or you can call third party companies as well who can do it on your behalf.
McAfee.com/Activate Since the world is developing each day with new computerized advances, digital dangers, malware, information, and harming diseases have additionally turned out to be increasingly more progressed with every day. These digital contaminations harm a gadget or documents in different ways.McAfee.com/Activate
Howdy, I’m Jhon. I’m a designer living in California, MD. I am a fan of technology, web development, and football. I’m also interested in swimming and dogs. Blogging Kaise Kare| Earn money online | income tax consultant | HP Printer Assistant | printer support.
I really happy found this website eventually. Really informative and inoperative, Thanks for the post and effort! Please keep sharing more such blog.
norton.com/setup
spectrum email login
www.aolmail.com
office.com/setup
kaspersky activation
Wow, incredible blog layout! How long have you been blogging for? you make blogging look easy. The overall look of your website is great, as well as the content! Marijuana Near Me,
Recreational Marijuana Near Me,
Best Marijuana Dispensary,
Great post i must say and thanks for the information.I appreciate your post and look forward to more.
mcafee.com/activate | www.mcafee.com/activate
آموزش طراحی سایت بدون کدنویسی با سیستم مدیریت محتوای وردپرس
https://webkima.com/wordpress-tutorials/
آموزش طراحی سایت بدون کدنویسی با سیستم مدیریت محتوای وردپرس
آموزش وردپرس
www.McAfee.com/activate - Download and install McAfee with an McAfee activation key. Learn more about its premium services by visiting mcafee.com/activate.
Visit McAfee official website www.mcafee.com/activate or mcafee.com/activate.Enter your 25 digits McAfee Product Key.Log in to your McAfee account or Create new.Click Submit and Choose “Country and language”.Once Logged in, Download your Setup.Run downloaded application to install mcafee. Installation Done.
Much obliged for the post and effort! You should keep sharing even more such information.
Aol Mail Login
Best method to create your primevideo mytv activation account through the activation process by primevideo.com/mytv. You need to follow the instructions to activate login amazon mytv
Wishing you the most awesome aspect karma for all your publishing content to a blog efforts.This is my first chance to talk this site. I discovered some fascinating things and I will apply to the improvement of my blog.
youtube video downloader
download youtube video
youtube video download
Office.com/setup | Activate Your Office Setup with Product Key
We Update blogs about various applications of Microsoft Office like how to use them, how to install them on different devices, and how to activate them.
Visit below links to get it resolved:
setup.office.com
www.office.com/setup
view/office-settup-com/home
office.com/setup
Hey Everyone, Are you getting errors when you try to activate your Microsoft office activation subscription?
Then read on to get step by step guide to solve Microsoft office activation errors. Protect your windows, Mac, and Android devices. Get and easily run Anti Viruses and Learn how to download, install, and activate your Office setup on your computer and other devices by the easiest steps. Just visit our website and Troubleshoot the most commonly occurring errors for Microsoft office365 by the easiest steps. Install, and activate your Office setup on your computer and other devices.
office.com/setup
office com setup
office .com /setup
www.office.com/setup
setup.office.com
very nice post thanks for sharing Soundcloud Downloader
moviesflix
For Linksys AC1200 setup, put router into operation and connect the device via Wi-Fi* or a network cable with the router. You can also use the Linksys AC1200 manual for the setup. Open web browser. Enter IP address in the address bar. Press enter. Enter username and password in the open user interface and confirm again.
"mcafee is an antivirus software providers that secure your computer for virus , worms ,trojens and other mailcious program .it provides full range of
security product like antivirus , firewall etc .you have to do mcafee antivirus download "
"Kaspersky Free is a completely free security solution that does not show any
third-party advertisements. Kaspersky Free also does not collect your personal data.
We value your privacy. Kaspersky Total Security is an overall good internet security suite. to click this link kaspersky antivirus"
Amazon is an American multinational technology company which focuses on e-commerce, cloud computing, digital streaming, and artificial intelligence. It is one of the Big Five companies in the U.S. information technology industry, along with Google, Apple, Microsoft, and Facebook. amazon .com
Cricut.com/setup is the key to unlocking your craft skills with the Cricut machine. For those who have no idea what a Cricut machine is, it is an electronic cutting device that can cut a plethora of materials and allows you to create craft projects. When it comes to cutting materials, it can cut Vinyl, fabric, paper, and some of its machines can even cut leather, cork, and wood. The gadget comes with a “Rotary Blade” to cut materials, including wood and fabric. It gives us a fundamental idea of how incredible an invention it is.
Cricut.com/setup
You can compare streaming devices with our Device Finder or find the best current deals on streaming players. Fubo offers the option to upgrade. Choosing the Family Share add-on for $6 a month bumps subscribers up to three streams at a time. Adding this option is easy. If you pay for Fubo TV through iTunes or Roku billing, you’ll need to change it on that device.
fuboTv connect code
fubotv connect enter code
watch live streaming on fubotv
Fubo TV has a vast range of content, including live sporting events, movies, and TV shows. It facilitates the streaming of compatible TV devices from any of the locations. FuboTV activate code is the code that is present on your TV screen. Open the app store on your TV, look for Fubo TV.
fubo.tv/connect enter code
Nice information, thanks for sharing this information. Visit OGEN Infosystem for professional Website Designing, SEO Services, PPC Services, and Digital Marketing Company in Delhi, India. Get professional websites for Corporate Website’s, eCommerce Website Designing Company in Delhi.
Best Digital Marketing Company in Delhi
Some truly wonderful content on this web site , appreciate it for contribution.
Bulk Email Sending Service Provider
Mass Mail Service Provider
Get the Best Real Estate Developers in Bangalore, Investment Plots in Bangalore, and Luxury Apartments near Manyata Tech Park by Preetidevelopers. For more information in detail visit our website.
Luxury Apartments near Manyata Tech Park
vdsblog
Post a Comment