Shot at dusk on the beach of Basin Head, P.E.I., CANADA
2008-08-05
Grand Falls Super Wide Angle
2008-07-30
Beach Crocs!
Here's the first of many pictures I will post in the next days that were shot during my vacation in Prince Edward Island, Canada.
Upon my return I was excited to learn that version 2 of Adobe Lightroom was out, and boy was I happy when I found out they included virtual gradient filters!
They will simulate and color you want, exposure, sharpness etc. and you can add many of them in any direction. How cool is that!?!
On this picture I used a blue gradient filter for the sky and a coral one for the beach.
More to come !
2008-06-24
Spiderlight & Softbox Food shoot !
Hi again everyone!
I did a food shoot a few days ago to test the possibilities of my softbox. I must say I am quite amazed at the results! :)

1/40sec F2.8 ISO 80 (please note I shot this using a Powershot S5 IS. The f2.8 on my camera is much more slower than the real f2.8 you are getting on a DSLR lens.)
I realize this is not lightning speed shutter, but with the camera on a tripod it doesn't do much difference. It is also to be expected from a light such as this one.
See setup shot below:

Hope you like it! It is my first experience at product/food photography.
Alex
I did a food shoot a few days ago to test the possibilities of my softbox. I must say I am quite amazed at the results! :)
1/40sec F2.8 ISO 80 (please note I shot this using a Powershot S5 IS. The f2.8 on my camera is much more slower than the real f2.8 you are getting on a DSLR lens.)
I realize this is not lightning speed shutter, but with the camera on a tripod it doesn't do much difference. It is also to be expected from a light such as this one.
See setup shot below:
Hope you like it! It is my first experience at product/food photography.
Alex
Spiderlight softbox (continued)
Well hello everyone.
Sorry it's been quite a while since my last posts about the spiderlight and softbox. I had waited a while for the parts needed to put everything on a light stand and I finally got them (like a month ago).
Now I finally found some time to take a few extra pictures as requested by a lot of people, and did a real good test out of everything. Read below for details.
First, I needed something sturdy to support this big softbox. So I went online to www.bhphotovideo.com and ordered an Impact Air-Cushioned Heavy Duty Light Stand.
Since this stand is only about 40$, I had a lot of doubts about it but when I got it I was amazed about how strong it really is. It's the perfect candidate to hold this big softbox.
Next I needed a swivel bracket to attach my spiderlight/softbox combo to the light stand and to be able to point it in the direction I want. Having looked over the official westcott website for a bit while designing my spiderlight fixture, I noticed this nice tilter bracket they made for their real spiderlite.

It's not cheap (about 32$) but I wanted something of quality that could last beyond my softbox so for me it was an obvious choice. You can get it here at B&H Photo.
Since my softbox design attached directly on the spiderlight fixture (I will improve on that on my future designs), all I need to do is attach the spiderlight to the tilter bracket. Since the westcott tilter bracket already came with an insert pin, I went to my local hardware store and bought this double treaded bolt along with two nuts. One end is designed to screw into wood and the other one is like a bolt:

So I pre-drilled a hole in the bottom of my fixture and screwed the bolt in place. Since there is no "head" on this screw/bolt, the only way you can screw it is by using a combination of two nuts. See picture below of the bolt in place on my spiderlight fixture:

With tilter bracket insert pin in place:

All that needed to be done next is to fit everything together:

Overall view, with the heavy-duty light stand:

Some people also asked me how I proceeded with the diffuser panel. Since I like when things are nice and clean, I went to my local fabric store and had them cut my white cotton fabric to perfect size and sewed a velcro around the whole perimeter. Since I was there I also bought a piece of ripstop nylon and had the same treatment done to it. She sold me a couple meters of self-sticking velcro for my softbox, so now I have two different diffuser panels that will velcro on demand to my softbox. Sweet!

Next chapter: REAL FOOD SHOOT with the softbox!
Sorry it's been quite a while since my last posts about the spiderlight and softbox. I had waited a while for the parts needed to put everything on a light stand and I finally got them (like a month ago).
Now I finally found some time to take a few extra pictures as requested by a lot of people, and did a real good test out of everything. Read below for details.
First, I needed something sturdy to support this big softbox. So I went online to www.bhphotovideo.com and ordered an Impact Air-Cushioned Heavy Duty Light Stand.
Since this stand is only about 40$, I had a lot of doubts about it but when I got it I was amazed about how strong it really is. It's the perfect candidate to hold this big softbox.
Next I needed a swivel bracket to attach my spiderlight/softbox combo to the light stand and to be able to point it in the direction I want. Having looked over the official westcott website for a bit while designing my spiderlight fixture, I noticed this nice tilter bracket they made for their real spiderlite.
It's not cheap (about 32$) but I wanted something of quality that could last beyond my softbox so for me it was an obvious choice. You can get it here at B&H Photo.
Since my softbox design attached directly on the spiderlight fixture (I will improve on that on my future designs), all I need to do is attach the spiderlight to the tilter bracket. Since the westcott tilter bracket already came with an insert pin, I went to my local hardware store and bought this double treaded bolt along with two nuts. One end is designed to screw into wood and the other one is like a bolt:
So I pre-drilled a hole in the bottom of my fixture and screwed the bolt in place. Since there is no "head" on this screw/bolt, the only way you can screw it is by using a combination of two nuts. See picture below of the bolt in place on my spiderlight fixture:
With tilter bracket insert pin in place:
All that needed to be done next is to fit everything together:
Overall view, with the heavy-duty light stand:
Some people also asked me how I proceeded with the diffuser panel. Since I like when things are nice and clean, I went to my local fabric store and had them cut my white cotton fabric to perfect size and sewed a velcro around the whole perimeter. Since I was there I also bought a piece of ripstop nylon and had the same treatment done to it. She sold me a couple meters of self-sticking velcro for my softbox, so now I have two different diffuser panels that will velcro on demand to my softbox. Sweet!
Next chapter: REAL FOOD SHOOT with the softbox!
2008-04-28
DIY Spiderlight.... SOFTBOX !
Last week I posted a DIY article on building a DIY Spiderlight. If you haven't seen it here it is:

I finally had some time to complete the softbox that was meant to go along this light fixture.
Here's what it looks like (without the diffuser panel):

I am so happy. The whole thing is very lightweight and also really strong. It also costs a fraction of a real softbox. Be advised though, this won't be done in an hour. It took me several hours to build it, and it is mostly because of the curved shape of the 4 sides. A "pyramidal" shaped softbox would have been much less complicated. But hey... does it look cool or what !
To build this baby you will need:
- a 4' x 8' sheet of black corrugated plastic. Also called Coroplast (about 20$ and you can get it at your local signmaker or hardware store).
- a roll of STRONG aluminum foil
- Spray adhesive
- Aluminum tape
- Some wood to make the frame
- Some material for the diffuser panel. I bought a piece of ripstop nylon. Seems to work fine and it is also the "standard" material for this purpose.
- a couple of "L" shaped metal brackets
- Tools: Knife, scissors, T-50 stapler + staples
That's pretty much it! About 35$ total for everything.
Here's how it was done:

Here's is a piece of coroplast with the layout of one of the big side parts.

One of the sides cut out. Notice the direction of the channels on this piece. This is important ! (No, I did NOT cut this on the hardwood floor!)

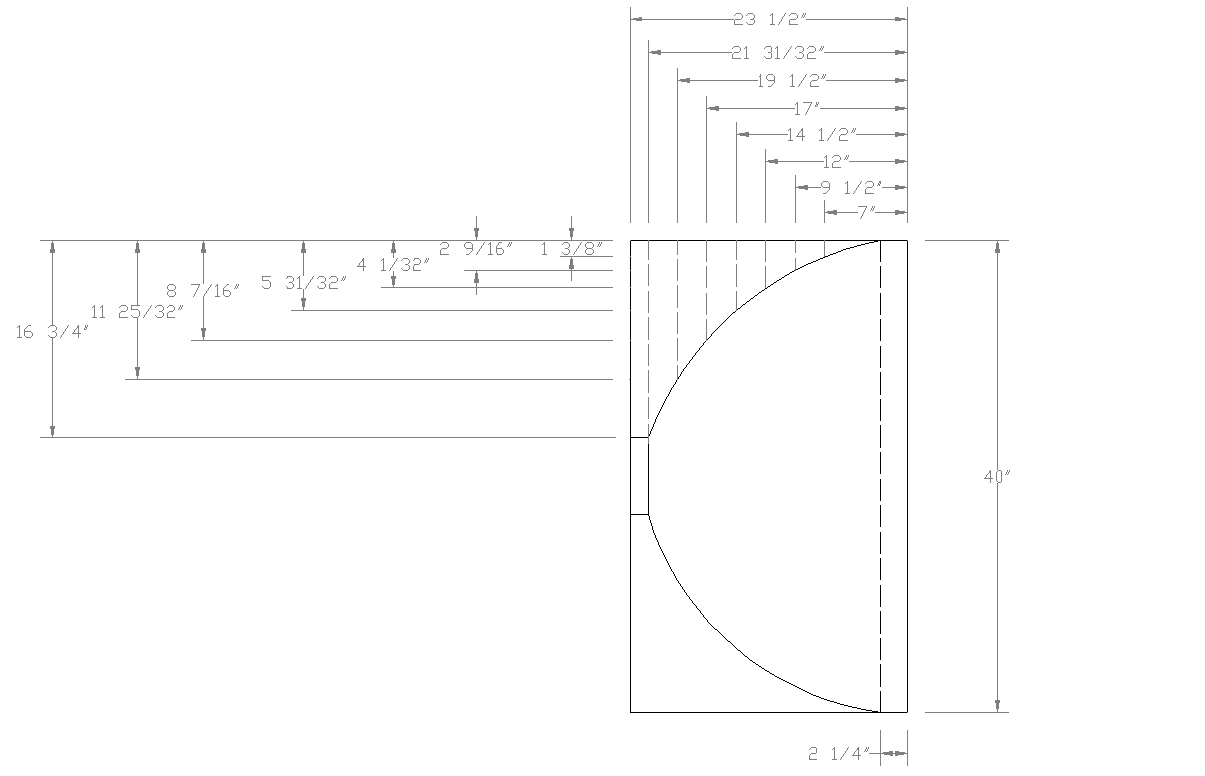
Here's a template for cutting the sides. Click for full size jpg.

Cutout of one of the top/bottom panels. Notice the direction of the channels on this piece. This is important !

When you bend coroplast in the wrong direction, it can be desastrous. To avoid permanent fold marks, simply take a very sharp knife and cut the FIRST HALF the the coroplast layer. I did a cut every inches or so. This allows the whole panel to bend nicely without any problem (at least not yet...more details coming).

Aluminum foil applied to the panel with spray adhesive.
***** UPDATE May 1st 2008 *****
It has been brought to my attention that Mylar (the stuff heat survival blanket are made of) could do a much better job of reflecting that precious light. A good thing to know. I will probably replace the alu foil with some of this mylar soon...


Here's the wood frame what will hold everything together. It will also be used to hold the diffusion panel as well. I did not picture any steps regarding the construction of this frame since the excellent strobist, do-it-yourselfer and photographer Nick Wheeleroz already did it when he build his own softbox. Click here to read his tutorial on building the wood frame. While you're there, take a couple minutes to check his incredible work too!
By the way Nick, I am a professionnal woodworker myself and i built it exactly the same way as you did. See, no need to go with fancy joinery on that thing :o)
The only difference with his version and mine is that I built it a bit thicker and added a additionnal screw from the side for increased stability.

Here's the part where I TOTALLY SUCKED at this project. The fact that I had cut the first layer of the coroplast to make it bend easier, also made it really soft. I had to temporarily attach both of the softbox sides to the Spiderlight fixture and figure out a crude way to support and secure the whole thing while installing the top and bottom panels. The side panels were first stapled on the wood frame.
I did not know what the final shape of the top/bottom panels would be so I had to take a big piece of thin cartboard and lay it down over the two installed sides and trace it out. I then transferred the layout on the coroplast panels.
Maybe I am making this sound simple but in fact it took me two whole afternoons of head scratching to figure out a way to do it all. Hopefully one of you guys will figure out a better way to do it and post it on this thread.
Oh and I forgot, the top/bottom panels were first stapled to the wood frame. Then, they were connected to the side panels using black duct tape. I know, it ain't pretty, but is holds damn well. At least it's not grey!

The completed softbox. Ain't it pretty ?

A quick look from the inside.

Lightbulbs in. Ready... set....

Yeouch! My eyes! :o)


I placed the diffusion panel (cotton sheet) over the softbox for testing purposes. Both of these shots were taken at 1/200 f2.8 ISO 80. The first one is with all 5 bulbs turned on. The second one is with only 3 of the bulbs turned on (see my tutorial on the DIY-Spiderlight for more details). You can really see the difference in brightness.

Taken at 1/1600 f2.8 ISO 80
Now a first field test (BEWARE OF THE MONSTER):

Yep. It's me. Turned off all other lights in the room and set my camera on the tripod. This shot is not really good. Here's why:
1- I was alone. I had to pre-focus on... thin air. No subject to focus on since i'm behind the camera while composing the shot. That's why it ain't sharp.
2- The softbox is still on the floor. I haven't got my lightstand and swivel bracket yet.
3- The subject is ugly!
4- Again I was alone so no one or/and no lightstand yet to hold a reflector for me.
Anyway. It does work! This was shot at 1/30 f2.8 ISO 80 (please note I shot this using a Powershot S5 IS. The f2.8 on my camera is much more slower than the real f2.8 you are getting on a DSLR lens.). Still a bit too overexposed on the lightened side. Of course this kind of light is not to be used to picture an excited child moving around.
That's pretty much it! Later this week i will install the diffusion panel with velcro on the wood frame. I will also work out a way to make the spiderlight removable with some sort of washers and wing nuts...
As soon as I have my lightstand I will do some more serious testing with hopefully better subjects than me.
Might take a while though... I want to order my first "off-camera" flash. But then I have to decide between Nikon or Canon, but then I have to decide of my next camera as well... and so as lenses and BLAAAHHHHH!!!!!
Anyway. Just give me a couple weeks. I'll be updating this thread as soon as everything is in.
Hope you like the softbox!
Here's some more test shots:

1/60 f2.8 ISO100, No diffusion screen, Softbox on left, DIY reflector on right

1/40 f2.8 ISO100 No diffusion screen, Softbox on left, DIY reflector on right

1/40 f2.8 ISO100 WITH cotton diffusion screen, Softbox on left, DIY reflector on right. Again,please note I shot this using a Powershot S5 IS. The f2.8 on my camera is much more slower than the real f2.8 you are getting on a DSLR lens.
Next chapter: Mounting the whole kit on a light stand!
I finally had some time to complete the softbox that was meant to go along this light fixture.
Here's what it looks like (without the diffuser panel):
I am so happy. The whole thing is very lightweight and also really strong. It also costs a fraction of a real softbox. Be advised though, this won't be done in an hour. It took me several hours to build it, and it is mostly because of the curved shape of the 4 sides. A "pyramidal" shaped softbox would have been much less complicated. But hey... does it look cool or what !
To build this baby you will need:
- a 4' x 8' sheet of black corrugated plastic. Also called Coroplast (about 20$ and you can get it at your local signmaker or hardware store).
- a roll of STRONG aluminum foil
- Spray adhesive
- Aluminum tape
- Some wood to make the frame
- Some material for the diffuser panel. I bought a piece of ripstop nylon. Seems to work fine and it is also the "standard" material for this purpose.
- a couple of "L" shaped metal brackets
- Tools: Knife, scissors, T-50 stapler + staples
That's pretty much it! About 35$ total for everything.
Here's how it was done:
Here's is a piece of coroplast with the layout of one of the big side parts.
One of the sides cut out. Notice the direction of the channels on this piece. This is important ! (No, I did NOT cut this on the hardwood floor!)
Here's a template for cutting the sides. Click for full size jpg.
Cutout of one of the top/bottom panels. Notice the direction of the channels on this piece. This is important !
When you bend coroplast in the wrong direction, it can be desastrous. To avoid permanent fold marks, simply take a very sharp knife and cut the FIRST HALF the the coroplast layer. I did a cut every inches or so. This allows the whole panel to bend nicely without any problem (at least not yet...more details coming).
Aluminum foil applied to the panel with spray adhesive.
***** UPDATE May 1st 2008 *****
It has been brought to my attention that Mylar (the stuff heat survival blanket are made of) could do a much better job of reflecting that precious light. A good thing to know. I will probably replace the alu foil with some of this mylar soon...
Here's the wood frame what will hold everything together. It will also be used to hold the diffusion panel as well. I did not picture any steps regarding the construction of this frame since the excellent strobist, do-it-yourselfer and photographer Nick Wheeleroz already did it when he build his own softbox. Click here to read his tutorial on building the wood frame. While you're there, take a couple minutes to check his incredible work too!
By the way Nick, I am a professionnal woodworker myself and i built it exactly the same way as you did. See, no need to go with fancy joinery on that thing :o)
The only difference with his version and mine is that I built it a bit thicker and added a additionnal screw from the side for increased stability.
Here's the part where I TOTALLY SUCKED at this project. The fact that I had cut the first layer of the coroplast to make it bend easier, also made it really soft. I had to temporarily attach both of the softbox sides to the Spiderlight fixture and figure out a crude way to support and secure the whole thing while installing the top and bottom panels. The side panels were first stapled on the wood frame.
I did not know what the final shape of the top/bottom panels would be so I had to take a big piece of thin cartboard and lay it down over the two installed sides and trace it out. I then transferred the layout on the coroplast panels.
Maybe I am making this sound simple but in fact it took me two whole afternoons of head scratching to figure out a way to do it all. Hopefully one of you guys will figure out a better way to do it and post it on this thread.
Oh and I forgot, the top/bottom panels were first stapled to the wood frame. Then, they were connected to the side panels using black duct tape. I know, it ain't pretty, but is holds damn well. At least it's not grey!
The completed softbox. Ain't it pretty ?
A quick look from the inside.
Lightbulbs in. Ready... set....
Yeouch! My eyes! :o)
I placed the diffusion panel (cotton sheet) over the softbox for testing purposes. Both of these shots were taken at 1/200 f2.8 ISO 80. The first one is with all 5 bulbs turned on. The second one is with only 3 of the bulbs turned on (see my tutorial on the DIY-Spiderlight for more details). You can really see the difference in brightness.
Taken at 1/1600 f2.8 ISO 80
Now a first field test (BEWARE OF THE MONSTER):
Yep. It's me. Turned off all other lights in the room and set my camera on the tripod. This shot is not really good. Here's why:
1- I was alone. I had to pre-focus on... thin air. No subject to focus on since i'm behind the camera while composing the shot. That's why it ain't sharp.
2- The softbox is still on the floor. I haven't got my lightstand and swivel bracket yet.
3- The subject is ugly!
4- Again I was alone so no one or/and no lightstand yet to hold a reflector for me.
Anyway. It does work! This was shot at 1/30 f2.8 ISO 80 (please note I shot this using a Powershot S5 IS. The f2.8 on my camera is much more slower than the real f2.8 you are getting on a DSLR lens.). Still a bit too overexposed on the lightened side. Of course this kind of light is not to be used to picture an excited child moving around.
That's pretty much it! Later this week i will install the diffusion panel with velcro on the wood frame. I will also work out a way to make the spiderlight removable with some sort of washers and wing nuts...
As soon as I have my lightstand I will do some more serious testing with hopefully better subjects than me.
Might take a while though... I want to order my first "off-camera" flash. But then I have to decide between Nikon or Canon, but then I have to decide of my next camera as well... and so as lenses and BLAAAHHHHH!!!!!
Anyway. Just give me a couple weeks. I'll be updating this thread as soon as everything is in.
Hope you like the softbox!
Here's some more test shots:
1/60 f2.8 ISO100, No diffusion screen, Softbox on left, DIY reflector on right
1/40 f2.8 ISO100 No diffusion screen, Softbox on left, DIY reflector on right
1/40 f2.8 ISO100 WITH cotton diffusion screen, Softbox on left, DIY reflector on right. Again,please note I shot this using a Powershot S5 IS. The f2.8 on my camera is much more slower than the real f2.8 you are getting on a DSLR lens.
Next chapter: Mounting the whole kit on a light stand!
2008-04-24
Alone in the fog....
Subscribe to:
Posts (Atom)